Thursday, May 28, 2009
Spending the Summer with some old friends
Hello Ladies!!
I am so ecstatic, excited, jumping up and down with anticipation....well, I think that you get the picture. I couldn't wait to give you a sneak peek at what June has to offer you from Stampin' Up! It is called “Summer Fun” and I am sure that you will just have a blast.
So....here are a few of the tantalizing tidbits!!
Spend the Summer with Old Friends. Last Chance List (formerly known as the Retirement List) available on June 1st. I will be posting it as soon as I can get my hands on it. I will be hovering online at 11 p.m on Sunday May 31st if any of you want to get first dibs!! (This is only available June 1-31)
Discontinued items offered at up to 50% off. These will be available only as supplies last. I can't wait to find out!! If you haven't tried online shopping with me yet, this will be a great opportunity for you to try it as you can put your order in as quickly as you want. Anytime, Anyday....24/7!! Just click on the icon on the side.
The Summer Fun Hostess Bonus Promotion : (June 1-30)
Hostesses who hold a $250-$399.99 workshop will receive an additional $20 in hostess free merchandise dollars.
Hostesses who hold a $400 or more workshop will receive an additional $40 in hostess free merchandise dollars
Hostesses may use their additional hostess free merchandise on any regular catalog or mini catalog merchandise.
I will also be carrying this theme through for Stamp Camp on June 12th at 7:30 pm. I hope to see you all there for our Summer Kickoff!!
Let's start this Summer of with Lots of Fun!!
Barbara Jean Smith
Meghan is Miss May!!!
My friend Jeanna runs a fabulous card swap over on Stamp Time Somewhere and started choosing card to feature once a month. I was so excited to find out that Meghan (this was her first swap ever!!) won the Miss May title. THe original post is here. This is what Jeanna posted about Meghan. And for those of you who don't know Meghan she is my second oldest. She also works at my Stamp Camps (she rules the Big Shot).
This was a hard decision for me. I had two swappers in mind. Although I know that the other swapper that I did not choose this month would have probably agreed with me. So I am still wanting to feature her later this week. Without further ado, I'd like to introduce to you:
MISS May - Swapper of the Month
Meghan Smith!
You may notice something very special about Meghan...she's only 13!!!!!! Meghan is lives in Southern California, is the second oldest at home of eight. She enjoys going to Disneyland with her family, she likes Miley Cyrus and the Jonas Brothers. She loves using the Big Shot and helps her Mom run it at stamp camps. Her favorite color to use is Pretty in Pink. Her mom is a great friend of mine, a Stampin' Up! Demonstrator and felow MISS swapper. I think that you will all agree that MISS Meghan has an amazing talent.
Next month's sets will be posted on the 1st, due to the Last Chance list being posted then.
Sunday, May 24, 2009
Off for some birthday fun!
I am taking a break today...Yep! It's my birthday! I am heading over to my momma's to make up a quilt and grab something yummy to eat. If the quilt turns out like I am hoping...you will see it here. If not, well, scraps anyone? Have a fantastic Memorial Day weekend!
Love,
Babs
Love,
Babs
Friday, May 22, 2009
Warning! You are going to want to make some time!
My challenge for myself was to catch up on the HUGE tech wave that is rocking the craft world. Blogging has gone crazy. Everyone I know blogs, visits blogs or even has a grandma who blogs...the list goes on. One step that I am working on is to bring you video tutorials, which would condense down the amount you would have to read as well as getting a chance to "SEE" what I am doing. Well, Stampin' Up! is doing the same. You can now have access to the great videos that they have created as well as Studio 5 videos. I am just so excited about this! Enjoy...don't fall in too long :) Click here to see for yourself: Stampin' Up! YouTube.
Here is a preview:
Enjoy! ~BJ
Here is a preview:
Enjoy! ~BJ
Thursday, May 21, 2009
Fifth Avenue Trifold tutorial
Inspire, Create, Share.....Sharing my stuff the Stampin' Up! Way
Fifth Avenue Floral Tri~Fold Card
Tutorial
Directions to make one Card
Measurements for cutting:
One piece cut at 6”x12”
Score lines:
Along the length score at
4” and at 8 1/16”
You want the outside flap to close over the inside flap smoothly.
Directions:
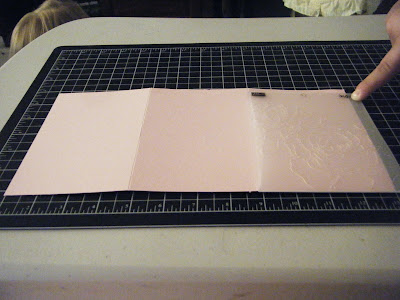
Fold your card so that the right flap lies inside and the left flap lies on top.
Take your Left (Top) flap and line it up with the Manhattan Folder so that the fold in the card lines up with the edge of the design.
Run through the Big Shot. Take note of the direction of the folder. Your arrow should be up. I ran mine through sideways, completely open.
Now do the same thing to the opposite side, only moving the folder not the cardstock.
Take note again the folder is now flipped. The arrow is underneath but still pointing upwards.
Now you have one embossed and one in-bossed side.
Cut edges of the roses, removing the cardstock that is not embossed. Cut up to the fold line and the continue up the fold line.
TahDah!
Now you can add an insert to the center. I did round the corners on my sample.
Have fun! If this card inspires you to create one yourself, please share what you make with me. I would love to see. Or link it to your blog so we can all see!!
Barbara Jean Smith
Wednesday, May 20, 2009
Girls aren't the only ones who want to have FUN!!
Okay ladies, this is just a fun post. My brother Caleb came by to pick up one of my girls and Meghan had left some of her stuff on the table. Before you knew it, he was picking up punches and trying them out and asking for adhesive (He loved the dimensionals by the way.) and just playing around. SO although his artwork was very primitive, I just loved having him over playing. I don't think I will get any more arguements about having my sister in law come and play as long as he gets to come too.
Monday, May 18, 2009
Cheers to You on Father's Day
STAMP SET: Cheers to You
PAPER: Whisper White, More Mustard, Not Quite Navy
INK: Stazon, Chocolate Chip, More Mustard, Bashful Blue,
ACCESSORIES:Aquapainter, Crystal Effects, pop up glue dots, heating tool
TECHNIQUE: Watercolor, Froth
How to make the Froth:
Mix equal parts of salt, flour and water. Mix dry ingredients thoroughly together. Add water. You want to end up with a thick glue paste. If you want to add color to mixture, now is the time. I dropped a couple of drops of white craft ink. Place your mixture in to area you want it to be. Using your heat tool, heat up your mixture. It will turn a slight shade different and then start to bubble up. I allow mine to completely bubble up. It took about 25-30 seconds. When the top images are done, I went and heated up the back for about 6-7 seconds. The top of the froth will continue to harden as it cools.
This shot is to show you the Crystal Effects on the mugs of beer. It was just an additional step and I love how it turned out!
All products were 100% Stampin' Up except for the Froth :)
Happy Stampin'~Barbara Jean
May Stamp Camp projects
***Kit Holders*** Your ribbon is going to be TIGHT to wrap and tie. We demonstrated how to tie the knot in the ribbon and then cut it in half. We then adhered the ends to the backside of the cardstock. Sorry if I forgot to mention that sooner.
SOFT SUMMER WATERCOLOR CRAYON CARD
STAMP SET: Soft Summer Occasions stamp set
PAPER: Riding Hood Red, Confetti
INK: Riding Hood Red, Sage Shadow
ACCESSORIES: Scallop Eyelet punch, Watercolor crayons (ruby red, chocolate chip and old olive)
TECHNIQUE: (Mist the stamp with water. Color directly onto the rubber. Spritz again when finished and stamp onto paper)
I used the watercolor technique (listed above) and 2 step stamped the focal point image. Set aside to dry. In the meantime, I stamped the front of the card with the "watercolor" looking floral image on the bottome of the card. I then cut and folded over 1 1/4 inch of the top of the card. I ran the edge through the scallop edge punch. I matted the watercolored confettin image onto the sage shadow box and centered on the front of the card. I then added the ribbon and adhered the flap down. The insert was merely another piece of confetti white paper and another floral image stamped on the top left and bottom right corners of the card. Sentiment was stamped in Sage Shadow.
24/7 FRIENDS SCRAPBOOK PAGE
STAMP SET: Warm Words, Great Friend
PAPER:Brocade Blue, Whisper White, Night of Navy
INK:Bashful Blue, Night of Navy, Brocade Blue
BIG SHOT: Top Note Die, Lots of Tags
ACCESSORIES: Ribbon
This is our first time adding a scrapbook page to our Stamp Camp. I think that everyone loved the addition. Here is how it went together. On the Brocade Blue 12x12 page, I first randomly stamped the butterfly image with the Brocade ink. I then rolled the Friends wheel (with Brocade ink) using the Stampin' Around ruler. My next layer was the strip of Night of Navy with the Whisper White scalloped edge adhered under it. I then layed out the picture on the left with the tags and Top Note journaling box on top of the Night of Navy ribbon on the right. The Top Note box as well as the title tag are stamped with the stem image from the friends set in Bashful Blue. For a final element, I stamped (with Bashful Blue ink) and cut three butterflies out of Whisper White paper. I Just placed them where I felt they would go the best. A big THANK YOU goes to Dawn for letting me use a photo of her little blue-eyed beauty!!
MANHATTAN FOLDER SAND & BRAYER CARD
STAMP SET: All Holidays
PAPER:Whisper White, Regal Rose, Vellum, Chocolate Chip
INK:Chocolate Chip, Pretty in Pink
ACCESSORIES: Brayer, brad, punch, Taffeta Ribbon, sanding blocks
BIG SHOT: Manhattan Folder, embosslit
TECHNIQUE: (Brayer ink onto White Cardstock creating a white core that you can sand.)
If you don't know by now, you know that I el ooo veee eee (LOVE) our Manhattan Folder! I just can't get enough! I could resist adding this one to our Stamp Camp just for the fun technique of Brayering and Sanding. Yes, the lightbulb moment that clicked for me. I totally forgot that we could create the white core on our cardstock just by simply brayering the top in a different color.
This card was brayered in Pretty in Pink and then run through the Big Shot with the Manhattan Folder. I then sanded the top of the embossed image, allowing the white cardstock core to show through. I then layer the top of the card with the vellum embosslit flower and Regal Rose scalloped border.
GOOD MORNING CHEEP TALK! GIFT CARD HOLDER
STAMP SET: Cheep Talk
PAPER: Good Morning Sunshine DSP, Kiwi Kiss, Whisper White
INK: Kiwi Kiss, YoYo Yellow, Chocolate Chip
ACCESSORIES: Punches-tag large and small, small oval and single ribbon. Satin ribbon
This gift card holder set is so easy peasy! You gotta love it. Here is the front view. Just a tag punch label attached with our Kiwi Satin Ribbon.
Inside view. This is created by taking a 6x6 inch square and folding it in half on the diagonal. Then you open it and bring the other two sides into the center. Fold and close. Easy Peasy, Lemon Squeezy!! You could just put in a gift card at this point but I liked having just a little bit more telling why this is for them. The insert is stamped with the same colors on the Whisper White and then matted on the Kiwi Kiss.
PARISAN BREEZE NOTE CARD HOLDER
Stamp Set: Watercolor Vine Wheel, Matchbox Messages
Ink: Baja Breeze, Chocolate Chip
Paper: Baja Breeze, chocolate chip, Parisan Breeze DSP, Whisper White
This project is a lot of fun. It goes together really easy just remember to use Sticky Tape so that what you attach to the textured DSP.
First, Lay ribbon out and adhere with snail adhesive. Don't worry about sticking long term. It is just to hold it while you put the binding on. Apply the binding to the center. I only use adhesive on the outside scalloped edges to allow better opening/closing of the Note Card holder.
This is what it should look like closed. If you have a kit from me, you actually have an addition scallop set that you can place on the front here.
Fold the note card holder on the score lines and once again, using sticky strip, adhere to the inside. I placed mine about 1/4 inch from the bottom.
This is what it should look like when the envelope holder and the note card holder are filled.
Here is a my sample of note cards that I made. Feel free to change and alter whatever you desire.
All projects are 100% Stampin' Up!
Sunday, May 17, 2009
Del Mar Quilt Show and the Big Shot!!
I was so excited to find out that my "upline" was demonstrating how to use the Big Shot in quilting at the Del Mar Fair. I came away with some fantastic ideas. Boy, this machine can do anything. It never ceases to amaze me. I see future quilts, bags, banners....oh the things I can do! It should be a fun sewing week at my house. If you would like to see this baby in action, you know what to do. Just let me know. :)
Here is Jill demonstrating the Big Shot. She had a few samples of her work up behind her. A couple of quilts, made up from a pattern that she created, as well as a quilted tabletop that I didn't get a picture of hung on the walls behind her.
Okay Ladies...see the celebrate banner behind her. Yeah, it says welcome on the other side. Hello! All my welcome banners now will have a dual use. Welcome and celebrate. Now the other side of my designer paper can get used too!! Yipee! Now, if you are making this banner from fabric, you would just basically make two banners and attach them together. It is nice because it actually adds a little more stabilization to it.
Here is a square that was made from the 3D star Big Shot die.
Another square made from the star only the star is inverted. It was also made with the oval scallop for the leaves.
Full inverted star flower with scallop circle die for the center.
I hope that this inspires you just as it inspired me!
Friday, May 15, 2009
Get Your Stamp On!
That's right. Tonight is the night. Stamp Camp is ready to go! See you after 7:30 pm. If you aren't able to make it, don't forget that you can always purchase the kit and make it at home.
Hope your Friday rocks!!
Barbara Jean
Hope your Friday rocks!!
Barbara Jean
Wednesday, May 13, 2009
TRY #3...A whole lot of shakin!
Okay! Well, if you can't tell, I am having a little IT difficulties. Now, you might think that being married to an IT man that I might not have much problem in this department. Alas, woe is me! My little computer here is just not high on the "I am home from work and I don't want to work on computers" list. So I am sorry for the late notice and gap in communication from me. I am finally up and running (after another glitch) and hope that you were able to enjoy some of the new blogs that I posted for you to enjoy.
Soooo, what's Shakin'? My joint! That's right...It's Stamp Camp time again! I hope to see all of your lovely and smiling faces on Friday night. It should be a blast and I can't wait to see all of you. FYI: We will be making a watercolor crayon card, a Manhattan flower "brayer & Sand" card, a gift card holder, a 3x3 note card holder (with 3 note cards and envelopes) and....drum roll please......a 12x12 scrapbook page. That is right ladies!!! 5 projects! Pack up that adhesive and get ready to rock. I am so excited about these projects. I can't wait for you to try them out. See you soon!
Monday, May 11, 2009
A Stampin' Up Mother's Day
I hope that each of you had a marvelous and restful Mother's Day yesterday. Mine was absolutely lovely and low key. I haven't had one of those in a long time. The kids "surprised" me with an annual Breakfast in Bed and homemade cards. My older kids all went above on their cards and really tried to do their best. I have to tell you, I was really impressed. Even Daddio got involved and created his first SU card for me. Needless to say....I was so blessed that they made me something that they knew would make my mommy heart happy, not to mention my stampin' heart too. :)
Elijah's (age 11)
Carissa's (age 14)
Meghan's (age 13)
Daddio's (age ?)
Me and my sweet peas
Elijah's (age 11)
Carissa's (age 14)
Meghan's (age 13)
Daddio's (age ?)
Me and my sweet peas
Saturday, May 9, 2009
Getting Happy with the Mini Occasions
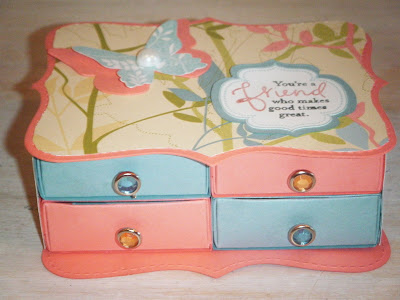
There is so much that our Mini Occasions Catalog has to offer. Stampin' Up! is known for their product integration as well as their ink and paper colors. This Mini Catalog is no exception. The stamps coordinate so well with the Big Shot dies. So much thought has been put into this. You truly feel that you are getting a Big Bang for your Buck. Who doesn't want that? I have had a marvelous time with our new Matchbox die. I love all the fun drawer possibilites and I have mastered the "no adhesive" technique. Yeah ME!! That's right..these little boxes fold up with no adhesive. But just the drawer itself. Life just keeps getting easier and easier...at least with my cards. Here is a new chest made with the Matchbox die as well as the Top Note Die. I made this with my "great grandmother" upline, Natalie. I hope that you enjoy it too.
SUPPLIES:
Paper: Walk in the Park DSP, Cameo Coral, Baja Breeze
Ink: Baja Breeze, Stampin Write Markers Cameo Coral, Basic Black
Stamps: Great Friend
Big Shot: Matchbox, Top Note
Accessories: Rhinestone Brads, Pretties Kit
TIP*****Make sure that you use our sticky strip when adding all the layers together. The Snail Adhesive does not hold it as tightly as the sticky strip adhesive does.
Friday, May 8, 2009
Mommy, Me and Crown City Tea
Today I took one of my daughters to her first tea. We went to one of my all time favorite towns....Coronado! I LOVE that town. It is full of beautiful houses, wonderful shops and of course, the famous Hotel Del Coronado. We had an absolutely delightful time and Katee learned some very valuable lessons. She is now extremely thankful that she wasn't born in the Victorian Era, tea is very yummy with 4 lumps of sugar and cream and not everyone supplies premium drinking water for my water snob. The Tea room was brimming full with antiques, beautiful tea sets and trinkets and baubbles. Art work adorned the wall, framed ornately. Porcelain dolls, mirrors and gawgeous chandliers! It was truly the afternoon break that I needed.
Katee at her first tea!
Katee's Tea Setting
Mommy's Tea Setting
Katee and Mommy
Our Yummies!
Here was our menu:
~SANDWICHES:
Egg Salad
Curry Chicken
Pear Walnut Cream Cheese
Cucumber/Dill
~FRUITBOWL garnished with house clotted cream
~FAMOUS Cranberry/Almond scones with Lemon Curd, Mock Devonshire Cream, Fruit Preserves
~DESSERT:
Cinnamon Apple turnover, with caramel sauce
Dark Chocolate Rossette
Spanish Cookie w/house wildberry preserve
~Teas: Black - Raspberry Vanilla; Herbal - Strawberry Vanilla Rooibos.
Friday, May 1, 2009
Picture the Possibilities Promotion!!
Join Stampin' Up! in celebrating National Scrapbook month with these THREE great offers!!
* All Designer Series paper, Specialty Designer Series papers, and 12" x 12" textured card stock are eligible for this promotion
* You can mix and match your paper choices.
* You must enter the qualifying amount of Designer Series paper or 12" x 12" textured card stock before entering your free paper.
* You may choose a free pack of Designer Series paper or 12" x 12" textured card stock for every three packs you buy.
* There's no limit and you can mix and match
JUMBLE ALPHABET!!! Buy a sneak peek stamp set from the 2009-2010 Idea Book & Catalog--Jumble Alphabet (set of 52; double-mounted)--at a 20 percent discount.
115199 Jumble Alphabet stamp set reg. $43.95 sale $35.16
and if that's not enough for you, Keep on going and see the GREATEST DEAL EVER!!!
This fully-customizable kit allows you to choose your own stamp set, your own pattern of Simply Scrappin' Kit, and your own colors!
Schoolbook Serif Alphabet stamp set (or any $43.95 or lower stamp set)
Simply Scrappin' Petal Party (or any Simply Scrappin' Kit, $19.95)
Earth Elements Assorted textured card stock (12" x 12") (or any Textured cardstock, $11.95)
Whisper White Craft Stampin' Pad (or any Craft Ink Pad, $7.50)
Business Supplies, including Training DVD, Catalogs, Order Forms, Brochures, etc. ($75 value, no substitutions)
I hope you find these promotions as exciting as I do. Even more, I hope that you might find the reason to embark on your own Stampin' Up! adventure and join my team! How much fun would that be?
Happy Stampin'!!
Barbara Jean
* All Designer Series paper, Specialty Designer Series papers, and 12" x 12" textured card stock are eligible for this promotion
* You can mix and match your paper choices.
* You must enter the qualifying amount of Designer Series paper or 12" x 12" textured card stock before entering your free paper.
* You may choose a free pack of Designer Series paper or 12" x 12" textured card stock for every three packs you buy.
* There's no limit and you can mix and match
JUMBLE ALPHABET!!! Buy a sneak peek stamp set from the 2009-2010 Idea Book & Catalog--Jumble Alphabet (set of 52; double-mounted)--at a 20 percent discount.
115199 Jumble Alphabet stamp set reg. $43.95 sale $35.16
and if that's not enough for you, Keep on going and see the GREATEST DEAL EVER!!!
This fully-customizable kit allows you to choose your own stamp set, your own pattern of Simply Scrappin' Kit, and your own colors!
Schoolbook Serif Alphabet stamp set (or any $43.95 or lower stamp set)
Simply Scrappin' Petal Party (or any Simply Scrappin' Kit, $19.95)
Earth Elements Assorted textured card stock (12" x 12") (or any Textured cardstock, $11.95)
Whisper White Craft Stampin' Pad (or any Craft Ink Pad, $7.50)
Business Supplies, including Training DVD, Catalogs, Order Forms, Brochures, etc. ($75 value, no substitutions)
I hope you find these promotions as exciting as I do. Even more, I hope that you might find the reason to embark on your own Stampin' Up! adventure and join my team! How much fun would that be?
Happy Stampin'!!
Barbara Jean
Subscribe to:
Posts (Atom)